PWA Demo
Giới thiệu
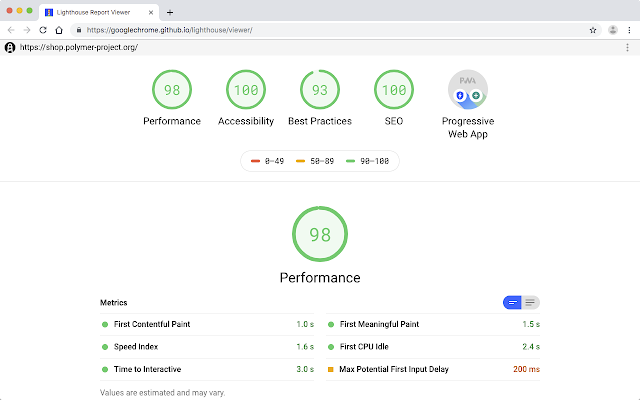
Ở bài trước, chúng ta đã nắm qua được góc nhìn cơ bản của PWA, và ở bài viết lần này, chúng ta sẽ tự thiết kế một Project cơ bản với đầy đủ các tính năng của PWA trong 5 MIN, và để có cái nhìn rõ ràng hơn, chúng sẽ dùng công cụ Lighthouse để đo các yêu cầu cần thiết của một trang web PWA. Vậy Lighthouse là gì, thì chúng ta có thể hiểu rõ hơn thông qua định nghĩa dưới đây
Lighthouse is an open-source, automated tool for improving the performance, quality, and correctness of your web apps. When auditing a page, Lighthouse runs a barrage of tests against the page, and then generates a report on how well the page did. From here you can use the failing tests as indicators on what you can do to improve your app.
Và với hình ảnh trực quan giúp chúng ta dễ dàng đánh giá
Thiết kế
Chúng ta có cấu trúc File như dưới đây:
App Demo
├── src
│   ├── icons
│   ├── index.html
│   ├── hello-world.css
│   ├── firebase-messaging-sw.js
│   ├── manifest.json
│   └── sw.js
├── .firebaserc
├── filebase.json
└── README.md
Triển khai
Create responsive hello-world app
Đầu tiên chúng ta cần thêm viewport và stylesheet link cho index.html
<!DOCTYPE html>
<html>
  <head>
    <meta charset="utf-8">
    <meta http-equiv="X-UA-Compatible" content="IE=edge">
    <meta name="viewport" content="width=device-width, initial-scale=1">
    <title>My hello world page</title>
    <link rel="stylesheet" type="text/css" href="hello-world.css" media="all">
  </head>
  <body>
    <h1 class="vertical-container">Hello World</h1>
  </body>
</html>
Chúng ta tạo file hello-world.css với nội dung dưới đây
body {
  background-color: #FF9800;
  color: black;
}
.vertical-container {
  height: 300px;
  display: -webkit-flex;
  display:         flex;
  -webkit-align-items: center;
          align-items: center;
  -webkit-justify-content: center;
          justify-content: center;
}
h1.vertical-container {
  font-size: 275%;
}
Host với FireBase
Trong ví dụ này chúng ta sẽ sử dụng FireBase để làm Host, chúng ta sẽ làm theo hướng dẫn trong đây Create Firebase project in Firebase console
<!DOCTYPE html>
<html lang="en">
<head>
<meta charset="utf-8">
<meta http-equiv="X-UA-Compatible" content="IE=edge">
<meta name="viewport" content="width=device-width, initial-scale=1">
<meta name="theme-color" content="#008000"/>
<title>My hello world page</title>
<link rel="stylesheet" type="text/css" href="hello-world.css" media="all">
</head>
<body>
<h1 class="vertical-container">Hello World</h1>
<script src="https://www.gstatic.com/firebasejs/4.4.0/firebase.js"></script>
<script>
// Initialize Firebase
var config = {
apiKey: "AIzaSyAXK4Orxl2CghIQvKiUPtkhEngSgzteqE0",
authDomain: "hello-world-pwa-8669c.firebaseapp.com",
databaseURL: "https://hello-world-pwa-8669c.firebaseio.com",
projectId: "hello-world-pwa-8669c",
storageBucket: "hello-world-pwa-8669c.appspot.com",
messagingSenderId: "660239288739"
};
firebase.initializeApp(config);
</script>
</body>
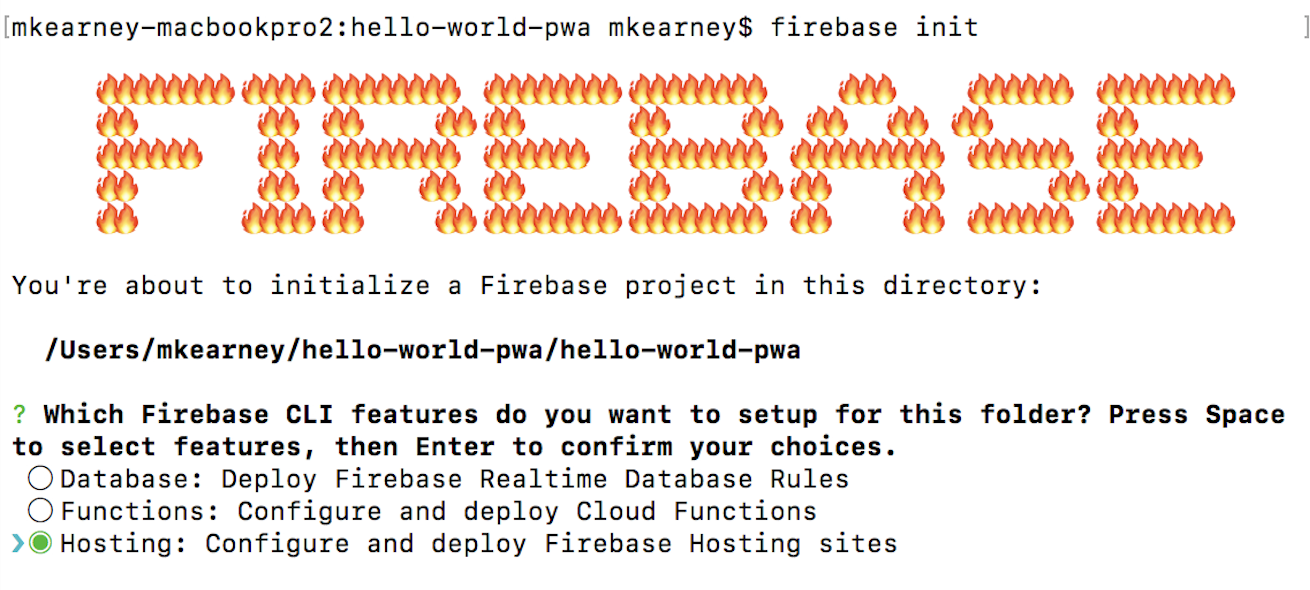
</html>Cài đặt FireBase Project
Chúng ta cài đặt node.js và run lệnh dưới đây:
$ npm install -g firebase-tools
$ firebase init    # Generate a firebase.json (REQUIRED)
Chọn Hosting:
Theo hướng dẫn của FireBase, bạn chỉ cần đổi public directory thành src và config thành single page app,
đặc biệt lưu ý không được overrite file index.html
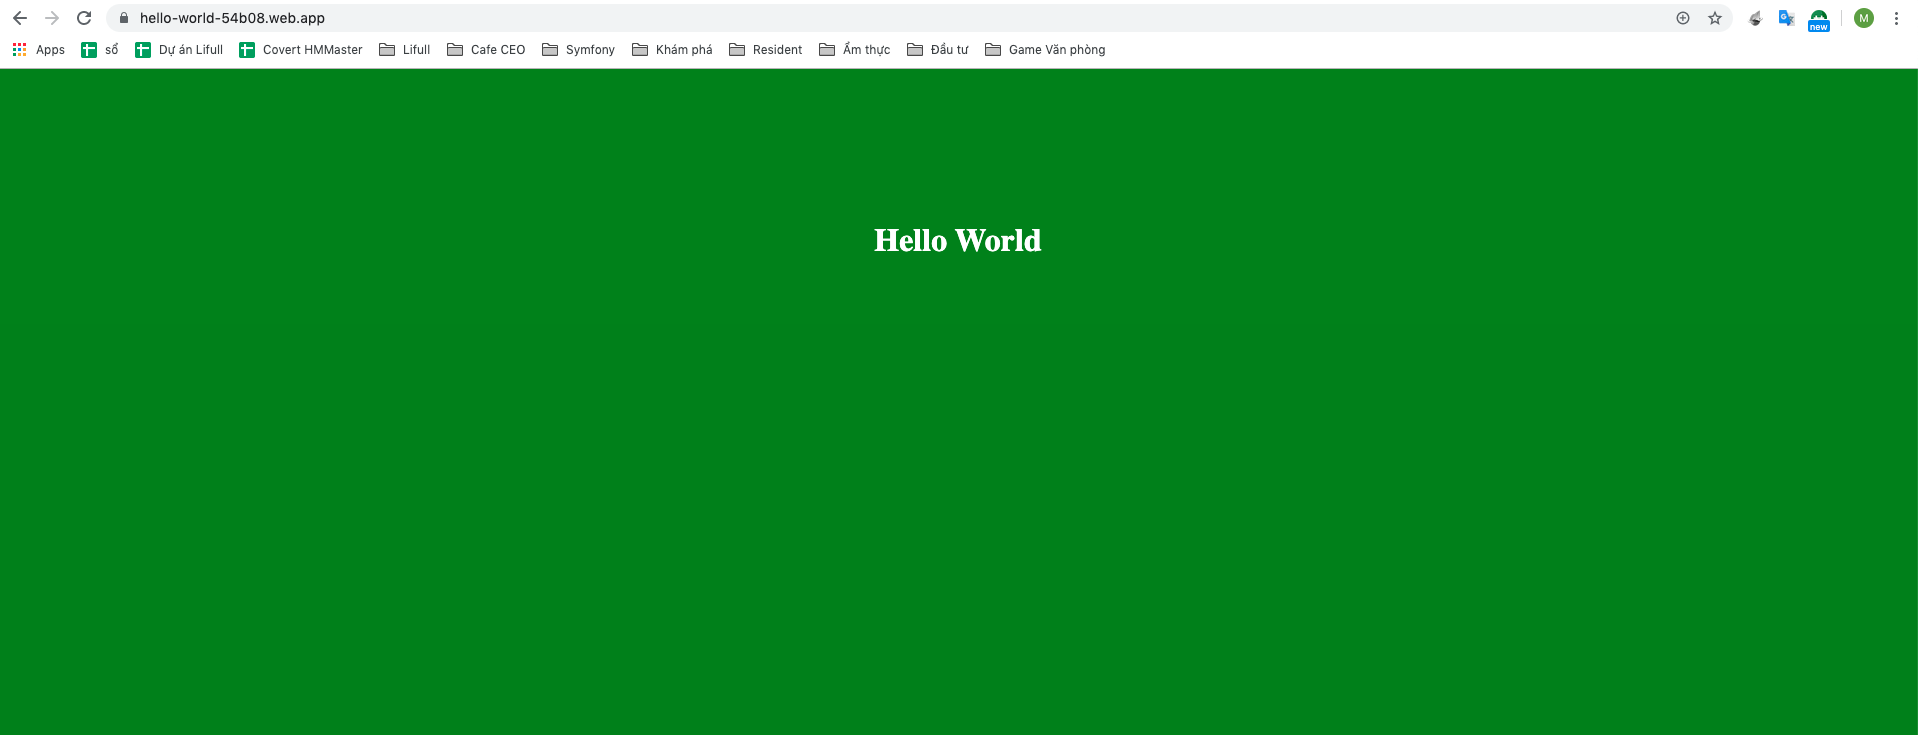
Deploy Firebase Project
Chạy lệnh dưới đây trong màn hình command
$ firebase deployVào thử link URL sẽ hiện thị giống như dưới đây:
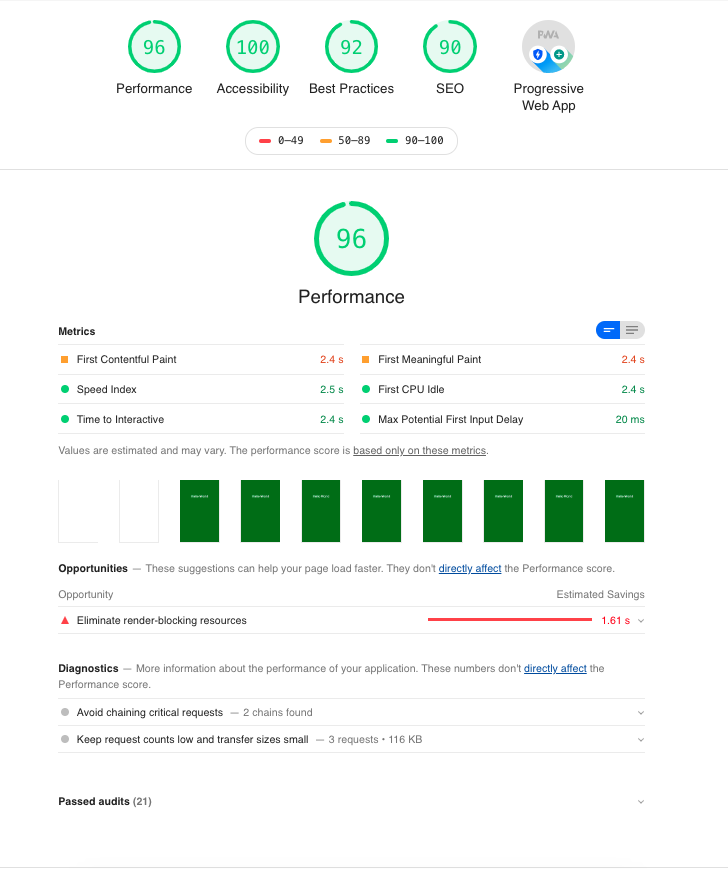
Chạy kiểm thử lần 1
Run Lighthouse
Get Lighthouse extension và chạy kiểm thử hosted site:
Bổ sung tính năng
Register Service Worker and Cache Static Resources
Service Worker hỗ trợ website của chúng ta có tính năng offline, nghĩa là chúng ta vẫn có thể sử dụng các tính năng của web kể cả khi không có mạng
Bây giờ, chúng ta sẽ test thử trạng thái trước vào sau khi cài đặt Service Worker để hiểu rõ hơn nhé
Hiện giờ chúng ta đã deploy một bản Demo lên Firebase
- Step 1: vào trang web https://hello-world-54b08.firebaseapp.com trên brower của mobile
- Step 2: Bật chế độ máy bay để ngắt mạng
- Step 3: Reload lại trangs
Kết quả: trang web không vào được.
Bây giờ, chúng ta sẽ cấy thêm Service Worker vào trang web, chung ta thêm đoạn Script dưới đây vào index.html
<script>
  if('serviceWorker' in navigator) {
    navigator.serviceWorker.register('/sw.js')
      .then(function() {
            console.log('Service Worker Registered');
      });
  }
</script>
Và bổ sung thêm một file sw.js để cache trang hello-world với nôi dung như sau:
var cacheName = 'hello-world-page';
var filesToCache = [
  '/',
  '/index.html',
  '/hello-world.css'
];
self.addEventListener('install', function(e) {
  console.log('[ServiceWorker] Install');
  e.waitUntil(
    caches.open(cacheName).then(function(cache) {
      console.log('[ServiceWorker] Caching app shell');
      return cache.addAll(filesToCache);
    })
  );
});
self.addEventListener('activate',  event => {
  event.waitUntil(self.clients.claim());
});
self.addEventListener('fetch', event => {
  event.respondWith(
    caches.match(event.request, {ignoreSearch:true}).then(response => {
      return response || fetch(event.request);
    })
  );
});
Sau đó chúng ta Commit và Deploy lại lên Firebase
$ git add -A
$ git commit -m "Add Service Worker"
$ firebase deploy
Cuối cùng chúng ta kiểm thử lại lần nữa:
- Step 1: vào trang web https://hello-world-54b08.firebaseapp.com trên brower của mobile
- Step 2: Bật chế độ máy bay để ngắt mạng
- Step 3: Reload lại trang
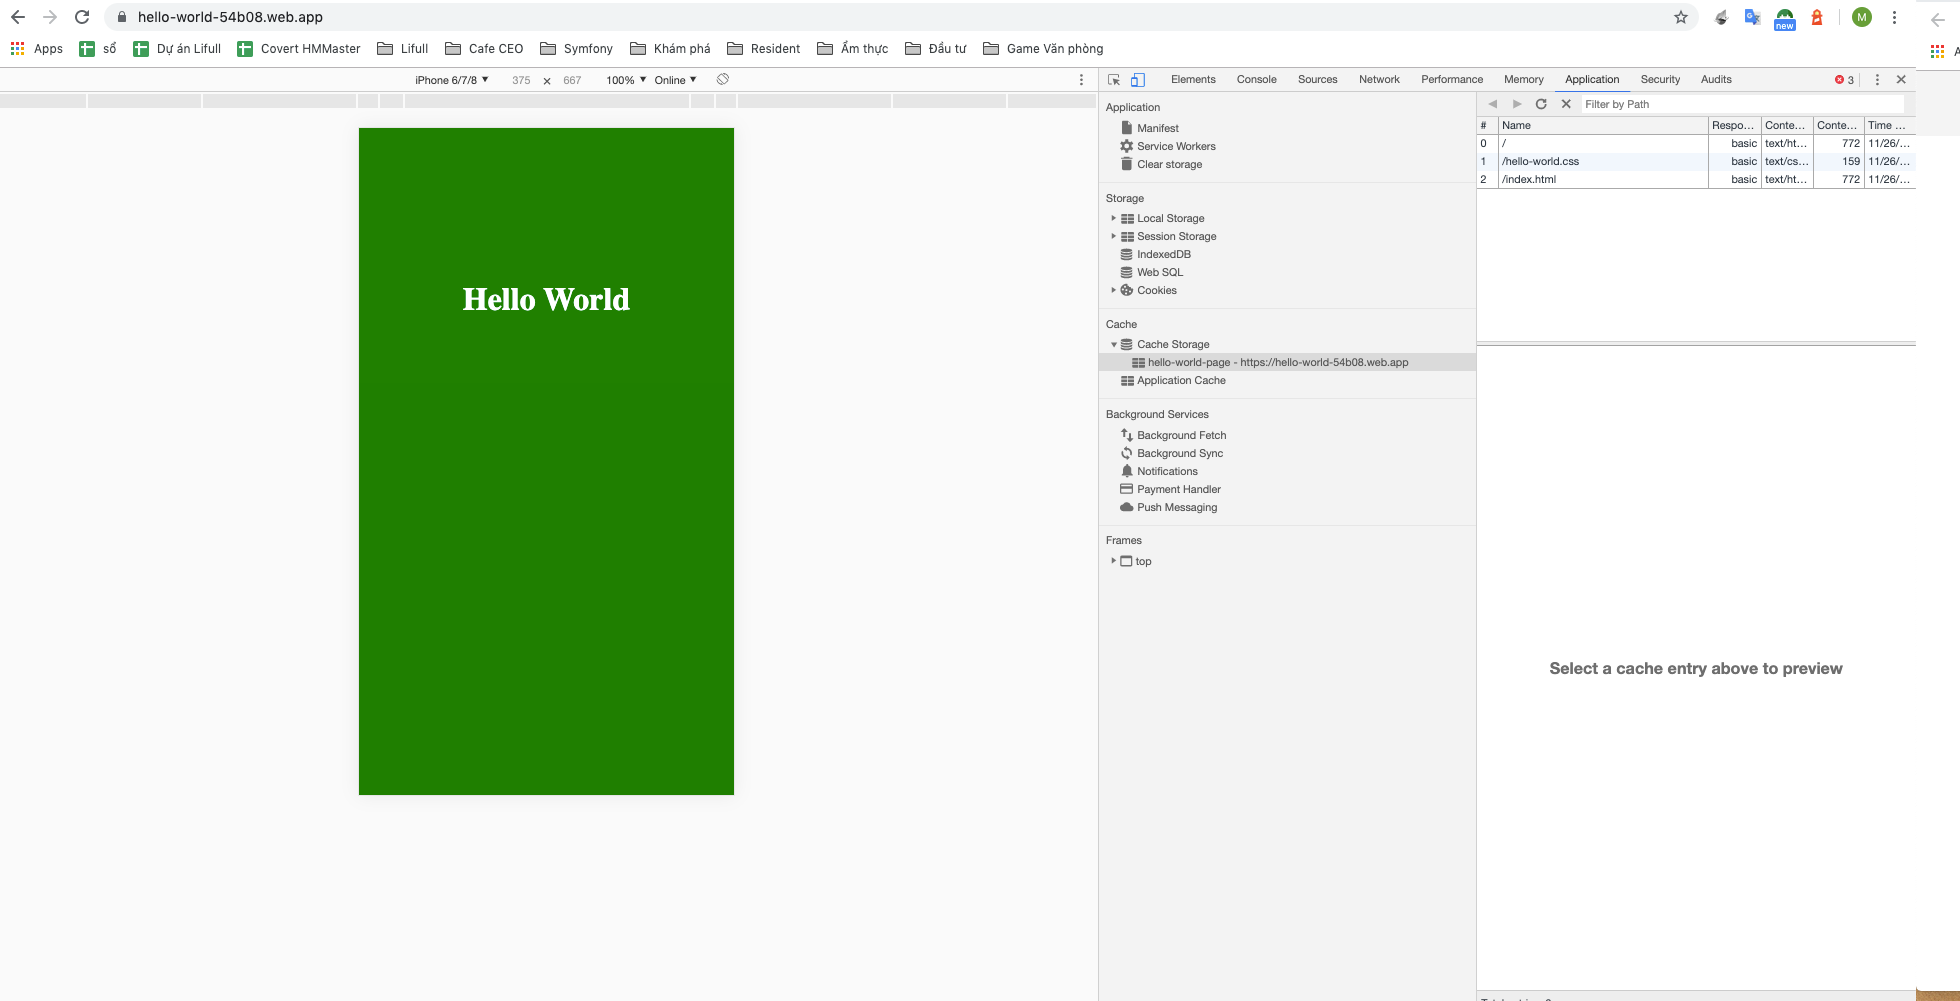
Kết quả: trang web vẫn được hiển thị đầy đủ.
Nguyên nhân là do file index.html và hello-world.css đã được Cache lại trên Cache Storage
Create manifest.json
Đây là một phần rất hay của PWA, manifest làm nhiệm vụ hỗ trợ tạo icon kết nối đến website trên màn hình Home, khiến nó nhìn sơ qua giống như một Application
Và chúng ta làm rất đơn giản như sau
Đầu tiên là chúng ta tạo file manifest.json với nội dung sau:
{
  "name": "Hello World PWA",
  "short_name": "Hi",
  "icons": [{
    "src": "icons/icon-128x128.png",
      "sizes": "128x128",
      "type": "image/png"
    }, {
      "src": "icons/icon-144x144.png",
      "sizes": "144x144",
      "type": "image/png"
    }, {
      "src": "icons/icon-152x152.png",
      "sizes": "152x152",
      "type": "image/png"
    }, {
      "src": "icons/icon-192x192.png",
      "sizes": "192x192",
      "type": "image/png"
    },
    {
      "src": "icons/icon-512x512.png",
      "sizes": "512x512",
      "type": "image/png"
    }
  ],
  "start_url": "/index.html",
  "gcm_sender_id": "103953800507",
  "display": "standalone",
  "background_color": "#FF9800",
  "theme_color": "#FF9800"
}
Và sau đó add thêm đoạn link dưới đây vào thẻ <head> của index.html:
<link rel="manifest" href="manifest.json">Xài thử xem nào
Chúng ta có thể check xem Manifest chạy được hay chưa bằng cách F12 và check trong Application
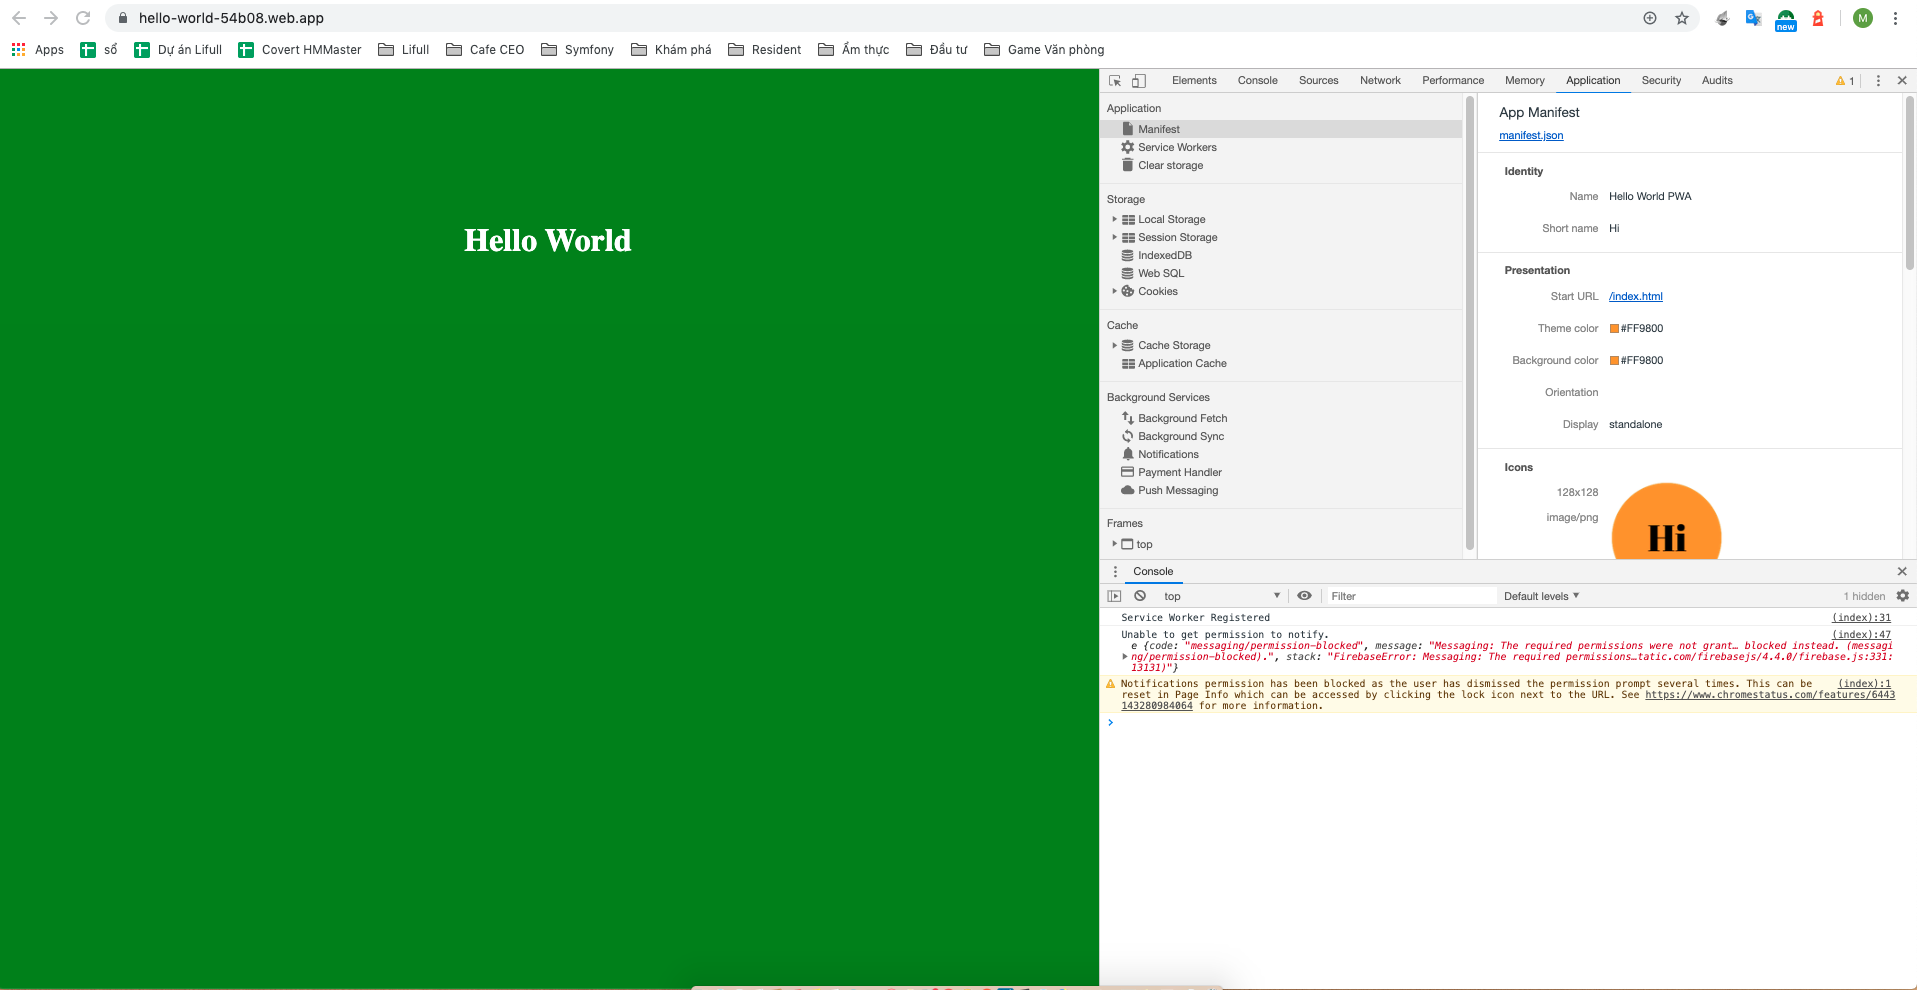
Nếu các thông tin của Manifest không báo lỗi là OK
Sau đó chúng ta có thể check thử trên Mobile


Sau khi thành công thì khi click vào icon ở màn hình Home sẽ hiển thị trang Web dưới dạng App (nghĩa là không hiển thị thanh URL)
Set up Push Notification
Để setup Push Notification chúng ta sẽ thêm đoạn Script dưới đây vào index.html
<script>
  const messaging = firebase.messaging();
  messaging.requestPermission()
  .then(function() {
    console.log('Notification permission granted.');
    return messaging.getToken();
  })
  .then(function(token) {
    console.log(token);
  })
  .catch(function(err) {
    console.log('Unable to get permission to notify.', err);
  })
</script>
Test Push Notification
Kết luận
Sau khi được trải nghiệm qua PWA, tôi tin chắc các bạn làm Web Developer đã có thêm một sự lựa chọn tuyệt vời để gia tăng trải nghiệm người dùng hỗ trợ trên Mobile, vô cùng đơn giản và đầy hiệu quả phải không nào ^_^